All of John Winters' tandem canoe designs including the Kipawa, Winisk, Mattawa and Quetico feature asymmetric hulls. With their narrower bow sections, these canoes are quite sensitive to fore and aft trim. One of the most effective means to adjust the trim on these boats is to shift the position of the bow paddler. In fact, a sliding bow seat is standard equipment on all of the production versions of of these canoes from Swift Canoe & Kayak. In most paddling pairs, the smaller of the two paddlers is usually in the bow, and the bow will then tend to ride high. A sliding bow seat not only allows the bow paddler to shift their position and weight forward bringing the craft back to level, but also as they move forward the distance between the gunwales is reduced as well, making it easier for the smaller person to reach the water with the paddle. In addition to compensating for different sized paddlers, it is also desirable to adjust the trim to better cope with varying wind and waves, lowering the bow a bit when going into the wind, raising it for a following wind, or somewhere in between to prevent unwanted turns in a cross wind.
Many home builders have asked how they can put a bow slider seat into their canoe. The process is not difficult if you can keep a few key points in mind, and work carefully, planning ahead before you cut anything. Before proceeding, install the gunwales, decks and all the thwarts except the bow thwart if there is to be one, taking care to ensure that the hull is the correct width at the gunwales all the way along the length of the canoe. Use the plans or the forms to obtain the correct dimensions at each station. Take care with this step, because it's not unusual for the hull to lose it's shape somewhat after it was removed from the mould.
Next, mark out the location of the front of the bow seat when it's all the way forward. You can get this dimension from the layout drawing which came with your Green Valley Boat Works canoe plans. You can mark this on the gunwale with pencil for now, on top of a piece of masking tape to avoid marking up the gunwales. Make sure that both sides are marked the same, running a tape measure from the very tip of the bow along each side in turn to make sure the marks are the same. Normally, you should allow about 12 inches for and aft movement in total, so, if you come back from the first set of marks by 12 inches PLUS the length of the seat measured fore and aft, and make a second set of marks. This corresponds to the back edge of the seat when its all the way back. If your canoe will have a thwart just aft of the bow seat, make sure that it will be centered at least four inches aft of this second set of marks, or else it would be in the way of the paddler's back when you move the seat all the way aft, and then complete the installation of the bow thwart. More on the bow thwart later...
The slide rails themselves should be made out of white ash or cherry, and should be 3/4 inch wide x 1 inch high, although small people can get away with up to 1/8 inch less in each dimension. The length should start out a few inches longer than the distance between the marks you laid out earlier. The front end of the rails will extend an inch or so farther forward then the front edge of the seat, since the hanger blocks which support the slide rails have to be in front of the front edge of the seat. Apply masking tape to the inside of the hull in the area where the front end of the slider will meet the hanger block.
Next, mark the inside of the hull on both sides to show the location of the top surface of the slide rail at the forward hanger point, which will be about 1/2 inch in front of the first set of marks on the gunwale. In John's canoes the typical height for the bow seat at the front edge when the seat is all the way forward is about 4 1/4 inches measured between the top surface of the seat and the bottom of the gunwales directly above. With a typical seat thickness of 3/4 to 1 inch, this translates into a spacer block about 5 to 5 1/4 inches long between the gunwale and the slider rail on which the seat rests. Hold a hanger block in position to mark a pencil line inside the hull at the bottom edge of the block, which is the top edge of the slide rail. Draw a vertical line corresponding to the hanger bolt itself. The front end of the slide rail will start about 1/2 inch ahead of that line.
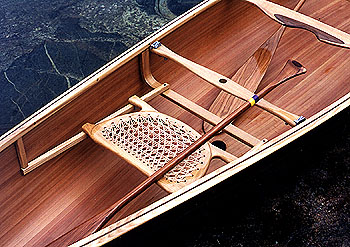
The rear end of the slide rail rests on top of a crossbar which runs side to side across the width of the canoe. This crossbar is suspended from the gunwale on hanger bolts also, with spacer blocks between the crossbar and the gunwales, centered on the rear set of marks you made earlier. Alternatively, the bow thwart can do double duty if it is installed at the marks and the slide rails are instead suspended from the thwart with spacer blocks shaped so that they inhibit any tendency toward sideways movement of the seat under load. This method is the current style from Swift. The most difficult alternative is to make a one-piece laminated low thwart as in the photo at the start of this article - but again, if you can't figure it out, you probably shouldn't try this at home! It's harder than it looks. In any case, the height from the top surface of seat to the underside of the gunwales measured at the rear of the seat when it's all the way back should be about 3 inches or so. If your slide rails sit on top of a crossbar, then you will have to add the thickness of the seat and the height of the slide rails to this dimension to arrive at the total length of the hanger blocks, which would then be about 4 3/4 to 5 inches.
After installing the crossbar, rest the rear of the slide rail on it and hold the front of the slide rail at the marks you drew inside the hull. You will note that only the one corner of the slide rail actually touches to hull. It will be necessary to cut off this corner at a compound angle to allow the slide rail to contact the hull on a flat, or else the corner will eventually wear a spot through the hull. An easy way to mark the this angled cut is to take a very short pencil stub and hold it so that it lays against the hull, and slide it all the way around the point of contact, drawing a line all the way around the slider. Remove the corner up to the line and you'll have a perfect fit. After you perform this procedure on both sliders, install the front hangers and sliders leaving the bolts finger tight, with the aft ends of the rails still resting on the crossbar. Then move the tail ends in or out until the distance between them is EXACTLY the same at the front and the back ends, and also exactly centered side to side on the cross rail. Double check everything one more time before you drill the seat rails and crossbar and screw the rails into place, and then carefully trim off the excess length.
Next, you will have to cut the ends of the bow seat to fit exactly side to side inside the hull so that it will rest on the slide rails. When you lay out the cut lines on the seat, keep in mind that the slider rails MUST be absolutely parallel or the seat won't slide, and so the cuts on the seat must also be parallel, so that the width between the two cuts must be the same at the back edge as they are at the front edge. If you want to get fancy and you think you're up to it, you can cut the front legs of the seat with a compound bevel to match the inside surface of the hull at the point where the seat will be all the way forward. If you can't figure out how to do this, you would probably be best off to not attempt it, because one mistake and you'll need a new seat. Talking about seats, you should check before you begin that the bow seat you have is an appropriate width for the task - it's nice to have a wider seating surface for the bow seat but at the same time you don't want to cut into any part of the webbing or crossbars when you trim down the width. My own design of caned seats shown in the photo above will fit neary any solo or tandem canoe fine by cutting the ends to fit.
Now, measure the distance between the rails, and subtract 1/16 inch from this measurement. This is the distance between the brackets that will hold your seat in place. Make up a set of brackets to fit your seat so that the brackets will hang down inside the rails and under them to allow free movement fore and aft, but prevent the seat from falling off. I have made these brackets out of wood on a rectangular caned wooden seat frame which I made so that the sides of the seat were exactly the same width as the slide rails. I've made the brackets out of 1/8 x 1 inch aluminum flat bar bent into a "Z" shape to fit on my sculpted Agawa bay seat design as in the photo above. Do whatever works, but again, be sure to keep the brackets centered side to side, or your seat won't end up where it's supposed to be. To install the seat, unscrew the tail end of one slider and pull it aside at the rear to open up the space between them, and drop the seat into position. Re-install the tail end of the slider, make sure everything fits okay, and the tighten up all four hanger bolts, and take a bow!
Finding extra long mounting hardware may be a problem. If you can't find what you need try buying a set direct from Swift Canoe & Kayak at 1-705-687-3710. Or, use 10-24 or 1/4-20 stainless steel threaded rod, or, you can do what I did and have same stainless steel threaded rod welded to a stainless steel carriage bolt to lengthen it - it worked fine!
Most people ask how the seat is held or locked into an intermediate position. Trust me on this, but it's not necessary to have some means of locking the seat - once the paddler's weight is on it, it won't move. You have to lift your weight to adjust the seat. By the way, just so that we're clear, you NEVER put a slider in the stern, and never put a slider into a symmetrical hull like a Prospector style canoe.