

Click on any image to see it enlarged.
The photos above illustrate a simpler method of 'glassing the inside of the hull. Some of the most popular canoebuilding books tell you to trim the inside fiberglass cloth to fit inside the ends AS you are applying epoxy. This may work well for an experienced builder, but for a first-timer, it increases the potential for a variety of problems on an operation that is already tough enough. In a worst case, you will have a heck of a mess on your hands, trying to cut glass wet with epoxy, and strands of fiberglass coming loose and getting stuck in the mess, and runs and bubbles, just as the epoxy is starting to kick over...well, you get the picture.
Of course, the usual way around this is to stop the cloth a couple of inches from the ends, but, to my eye (and touch) that is also pretty ugly and unfinished looking. The photos above illustrate an easier way, although a bit slower, to get a perfect job every time.
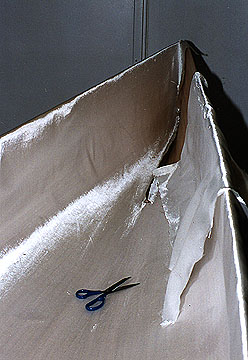
1. From left to right, the job starts with carefully sanding all the way up to the stems. A little extra care here improves the end appearance immensely. All of these steps must be done at both ends of the canoe at the same time, with the exception of wetting out, which starts at one end only and progresses to the other.
2. Next, carefully lay the cloth into the boat, avoiding wrinkles. Work slowly and avoid snags and pulls in the cloth. Drape the cloth carefully over the edge of the hull. Slit the cloth up the centerline from the ends up as far as the end of the stem, but no farther. Make a short crosscut at right angles at the end of the slit. All during this process, work carefully to avoid or dispose of any loose strands or bits of cloth.
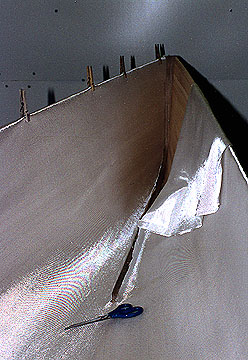
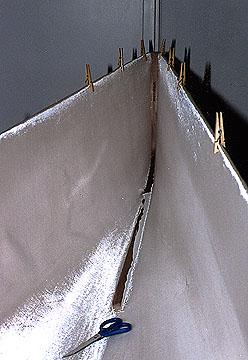
3. First on one side, carefully trim the cloth until it fits exactly into the corner between the stem and hull. Along the bottom where the stem sits above the inside of the hull, rather than trim the cloth into the corner, simply crease it so that the cut edge stands straight up. Use clothspins along the gunwales to hold the cloth in position.
4. Complete trimming the second side the same way as the first. Take care not to disturb the parts already done. Again, notice the excess cloth along the bottom, standing up beside the stem. By the end of this stage, the cloth should be 100% completely in position and trimmed throughout the inside of the hull, so that no trimming or adjustments have to be done during the epoxy application.
5. Now, wet out the cloth using System Three Clearcoat. Start about a foot from the end as you work carefully into the end. Avoid loading the brush too much as you get into the corner, because a run at this stage would be difficult to catch without disturbing the edge of the cloth. As you work outward away from the end, do not continually brush in the same direction, because you will start to push the cloth in that direction. If you do raise a wrinkle, work it out right in that spot - do not just push it along. The main portion of the cloth must not shift position. Remove the clothespins as you move along the hull.
After the epoxy is complete, continue checking on the hull every once in a while to see if problems are developing, such as wrinkles, bubbles, runs, etc., so that you can deal with it before it completely sets up. Using System Three Clearcoat, check at least hourly for the next few hours; with West System, check every 15 minutes. After the epoxy is still tacky to the touch, trim the glass to within 1/2 inch of the sheerline and press down the cloth with a squeegee wherever it looks like it is lifting. Later when the epoxy has cured dry to the touch, trim the glass flush with the wood.
Avoid trying to wet the entire exposed surface of the stem at this time, as you may start to pull out loose fibers in the cloth. After the epoxy has sufficiently cured that you can trim off the excess cloth along the stems, you can coat the remainder of the stems.