The usual method of planking involves stapling the strips to the forms to hold all the strips in position until the hull is completely planked and the glue is dry. The staples are then removed and the hull is sanded and fiberglassed. The only downside is that, short of painting the hull, it is virtually impossible to conceal the staple holes. This is only a problem to those 'master craftsman' builders who want their work to be the very best that it can be, and their canoe to be a floating work of art. While this is not a bad thing (I count myself a part of that group), it certainly isn't for everybody. However, if you staple, I would suggest that you at least make an effort to have the staples in neat rows to improve the looks of the finished boat.
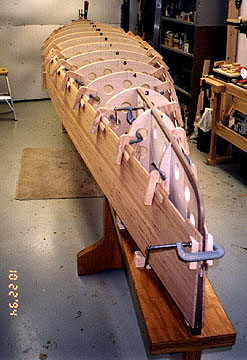
With the 'no-staple' method, each strip is clamped in place until the glue dries. The next strip is then glued and clamped in position. The trick is in the clamping arrangement, plus how to handle the difficult areas that seem to defy normal clamping. The payoff is no unsightly staple holes, and very few gaps between strips to fill before 'glassing. Besides eliminating visible staple holes, the process of clamping up the strips lets you get tighter joints between the strips, which also improves the appearance. However, there's no structural advantage to the 'no-staple' method - it's all aesthetic. It looks a lot nicer, but it's more time consuming. Having said that, it's really only worth it if you're prepared to make a similar effort on all other aspects of the boat. Figure on adding about 30 to 50 hours. Also figure on confounding many so-called knowledgeable people who can't fathom how you did it!
Before starting the planking, you must make up your clamping jigs and wedges, as well as prepare the stations. Each station must have a series of 2 inch diameter holes drilled around the hull perimeter, similar to the holes in the stem moulds. This can be done easily with a drill press and a hole saw before the stations are set up on the strongback. The exact spacing of the holes is not critical - a rough guide is to place a hole every 4 to 5 inches along a line running parallel to the outer edge of the station, about 3 inches from the edge (leaving about 2" from the edge of the holes to the edge of the station.)
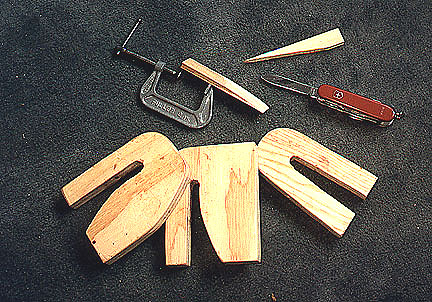
You also need to make up a quantity of clamping jigs (2 per station) and wedges. If the strips for your canoe are long enough, you can cut 6" off the end of the bundle, which will give you enough pieces to make the wedges. If you have no length to spare, hopefully you have a few more strips than what you need, and can take a few that have the worst colour, grain or defects, and use them to make your wedges. At a minimum, you'll need two pieces for each clamping jig. Half of those wedges must be cut to a point with a shallow angle across the thickness of the strip, and the other half must be cut into wedges along the width of the strip. These latter wedges will be inserted into the space between the end of the throat in the slot on the clamping jig and the current strip, so that as the wedge is driven in it pushes the strip tightly against the previous strip. The other style of wedge is inserted beside the current strip in order to push it tightly against the station. To make the wedges, simply rough cut the angle with a sharp pocket knife or chisel (don't cut yourself!), and give it a few seconds on a belt sander to finish up. It shouldn't take more than about 10 - 15 seconds per wedge.
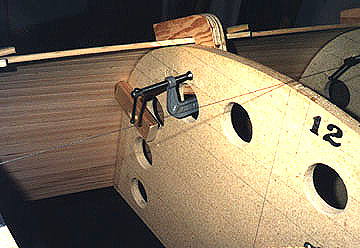
The clamping jigs can be cut from cheap 3/4" plywood. In this case, the clamping and wedging stresses are apt to be high enough that particle board is not likely to stand up for very long, so it's best to plywood in the first place. Cut the plywood into 4" x 6" pieces. The slot can be made by first drilling a 1/2" hole, and then cutting the slot with a band saw. The inner side of the slot must be cut away to provide clearance as you are planking around the turn of the bilge. Likewise, the inner top corner will have to be cut back for clearance for those jigs used with the first and last two stations, for when your planking approaches the stem moulds. Lastly, for clamping the strips to the stems, make up four clamp blocks with the clamp faces bevelled to correspond to the average angle of the bevelled stems, so that your spring clamps or whatever won't slide off (see photos). Line the faces of these blocks with sandpaper facing out on the bevelled side so that they won't slip on the hull as you apply the clamps.
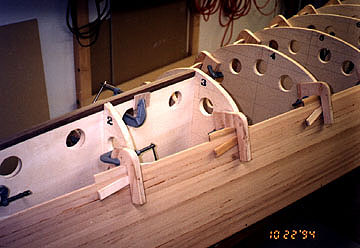
When you are ready to fit the first strip, take care to get it just right in every way - this is your foundation. It must be nailed to the forms - don't worry, the nail holes will be covered by the gunwales later. At the stems, to which all of the strips are glued, the first strips can be held in place with staples, because the staple holes will be hidden beneath the gunwales. Attach the other side first strip, lining it up to match the first side precisely. All subsequent strips must be clamped at the stems while gluing, but they can be forced down tightly against previous strip by a scrap piece of strip pushing down against it from above. This scrap piece can be stapled (not glued) to the stem temporarily. (See photos), while the clamp blocks hold the strip in tightly against the stems with C-clamps or strong spring clamps.
Proceed with planking. Take care not to push the first strips out of position in the process. A handy trick I use is to squeeze the strips together edgewise by hand, gripping the top and bottom edges of the stack as they begin to accumulate on the form. To do this without damaging the edges of the cove side of the strip, I keep a 6 inch length of 1/4 inch dia. dowel handy, just lay it in the groove and now you can safely apply pressure. (Just in case it wasn't obvious already, your strips MUST be oriented with the cove facing upwards so that you apply glue into the trough of the cove on the strip which was previously installed.) Keep the glue bead small and steady, avoid squeeze out, and wipe it off when it happens, ESPECIALLY inside the hull at the ends by the stems. This will make you a much easier person to live with when it comes to sanding the inside of the hull.
Before you add each new strip, use a piece of scrap strip to mark out on the stems where the glue has to go, so that you can brush out the glue exactly where it's needed. Also, lay the next strip across the top of the form lengthwise, and check that it is long enough to reach the ends. Check that it is centered end to end, and mark where it meets the middle station with a faint pencil mark. (Its pretty frustrating to attach a strip and get all the way to the stem only to discover that you misjudged and are now too short at one end and too long at the other.) Use two spring clamps at about the third stations to support the ends of the next strip as you pull the middle of the strip down into contact with the previous strip at the middle of the boat and clamp it in position, using the two wedges at each clamping jig.
Alternate fore and aft, clamping at each station working out from the center of the boat. After a few stations are clamped, remove the spring clamps at the ends of the strip, lay the end of the strip into its proper position, and reinstall the spring clamp, so that it grips the second or third station, but hangs downward contacting the new strip gently to hold it into the groove to keep it positioned as you complete the clamping process. Once all the clamps are in position, go over them again, tightening and fine tuning their position as required. (Look at my photos once again if any of this is not crystal clear.) Gently trim the overhanging ends of the strip but LEAVE THEM AT least 1/2 INCH TOO LONG past the stems. This is NOT the time to take them flush. You just want the ends out of the way so that you can install the opposite side strip. And so on...
Here's another neat trick. As you are laying the strips around the turn of the bilge amidships, you may encounter a situation where the current strip simply refuses to sit tightly against the previous strip in between stations, resulting in a gap between strips, with no way to clamp them. In this instance, have handy a few of the cheap metal 'gutter hooks' used to tie roof-top loads to automobiles with the old style rain gutters (remember them?). These hooks are often included in the canoe carrying kits that have four foam blocks, a length of yellow poly rope, and four of these hooks. Anyway, all you do is put a four or six inch length of 1/4 inch diameter wooden dowel into the cove on the current strip at the gap, and hang a weight on it by means of the hook. The dowel protects the strip from damage. Tie a string from the hook to the weight and run the string on the outside of the hull. The weight can be anything handy - I used a gallon jug of something or other that was sitting in the shop - and simply let it hang. The weight will pull the gap closed until the glue dries, and there you have it!
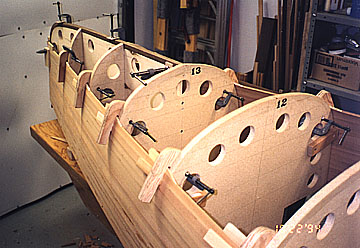
There are several more noteworthy points to complete these directions, the first and most important being that you need to watch out for where the previously laid strips begin to pull away from the stations in spots, due to the fact that there is no line of staples holding each strip down. When this begins to happen, you must take alternate steps to hold the developing hull against the stations. My method is to take a piece of scrap wood, say 1 x 2 x 4" long, and shape one end on a belt sander so that it will fit the inside contour of the hull at the point at which you'd like to push the hull in. This point needs to be right at a station - you can select a spot by pushing the hull in against the stations with your hands and checking if the hull lays nicely against the forms. Glue the end of the block against the inside of the hull at that location, holding it in place with a clamp passed through one of the clamping holes in the station. You can use the same glue as you're using for gluing the strips. At this point, while gluing, the hull is not against the station, but may be even further out while the block is pushing firmly against it. Once the glue is dry, loosen the clamp on the block of wood, push the hull in tightly to the form, and retighten the clamp to hold it. You can then drive a screw through the block to free up the clamp. (I predrill and countersink the blocks for screws to make it easier.) In total, I wind up using 1 to 2 dozen such blocks to hold the hull in place. After the hull is off the mold, I give each block a tap with a hammer to break it out, and all traces of the glue are removed as you're sanding the inside of the hull.
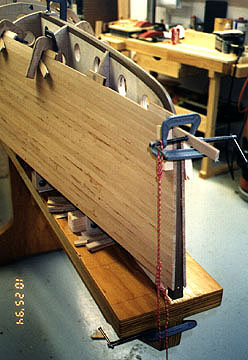
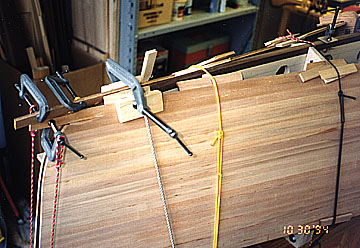
Second, as you work your way up the sides of the hull, you will inevitably reach a point at which there is no longer room for the clamping jigs at the stem moulds. At this point, you will need to use another alternate method of clamping. While it's not pretty, it is fairly easy to use a few pieces of rope at each end of the boat, tied around the hull with a Trucker's Hitch so that it can be pulled tight. The trick here is to use strategically placed scraps of strip, wedges, etc. to apply pressure at all the right points and also to protect the hull from being indented or marked by the rope itself. This method generally has to be employed for only about a half-dozen or so strips that contact the keel portion of the stems.
And third, this one is a tip - a way to deal with those few strips which must undergo a severe twist. These are the few strips which lie nearly horizontal in profile at the center of the boat, but must twist to near vertical at the stems. Without a way to deal with these, they can be quite bothersome to force into the proper position and hold still for gluing - and an even worse problem when you are building without staples. You begin each strip in the usual fashion, working from the center outward, but stop after the middle third of the strip has been clamped. Then, the trick is to use a small C-clamp at the ends of the strip past where it contacts the stems. Tie a string to the outboard end of the little clamp, and pull down on it to cause the strip to twist in the right direction. Tie the string to the strongback with a nail, screw or another C-clamp. The string and clamp are now carrying all of the torque load twisting, leaving the strip to lie neatly in place against the previous strip even before you get your station clamps all installed. Complete the strip by installing the remaining clamps. Leave the string in place until the glue has dried sufficiently that all the clamps can be removed in preparation for the next strip.
In using the 'no-staple' method, the total time for planking will of course be much greater than it would be with the conventional method. However, this need not be a major burden for the home builder, as most of the extra time is spent waiting for glue to dry. In my case, each day when I got home from my 'day job', I would install one strip on each side. Then after supper, I would do two more. On Saturdays, I could do 6 to 8 in a day, even when waiting two hours between pairs for the glue to dry. If you want to keep busy with useful work, simply use the waiting time to make the seats, thwarts, decks, and so on.
lastly, a word about clamps: if you are going to attempt the no-staple method then you'll want about thirty to forty 2" C-clamps. Find the cheapest source at a place you regularly shop, such as Sears or Wal Mart, and just "take your change in C-clamps" whenever you go shopping. The cost is pretty painless this way.
I am indebted to Ted Moores, who taught me this method years ago. You can rest assured that it works. The idea of using the internal blocks to pull the hull in is my own addition, which differs a bit from Ted's method, but I think it suits our canoe designs and the average builder much better. In conclusion, I advise to stay well away from the many dubious and bizarre alternate methods I have heard being suggested by well-intentioned know-it-alls who have never actually built a stripper using their suggested methods, if they have even built a stripper at all. These ideas include everything from bungee cords to hot melt glue, but I won't give further credence to these ideas by discussing them in detail. Remember, you've been warned. So, good luck, and have fun!