Click on any image above to see it enlarged.
In a solo tripping canoe such as the Osprey or Osprey II, the builder is always faced with the problem of how to carry it on a portage. A carrying yoke of any kind has to be removable because the paddler sits at the center of the canoe. John Winters prefers to simply lash his paddle and spare paddle between the thwarts so that the paddle shafts rest on his shoulders, however, I found that awkward. There are several portage yokes or kits on the market which let you clamp a removable thwart to the gunwales. However, they have to be clamped fairly hard to prevent them from slipping, and all the little bits tend to be fiddly, because they have to be made adjustable so that one size fits all. Not to mention that it won't match the look of the boat. What to do?! Well, I came up with a solution which looks and works great, but I must caution the reader that this is extremely time consuming to make, and it is probably beyond the skills of most home builders. But, if you know your own abilities, and you think you can do it, then go for it! All I ask for this idea is that you give me credit verbally or in writing wherever you show your boat.
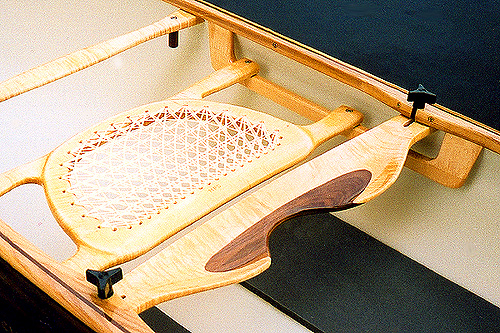
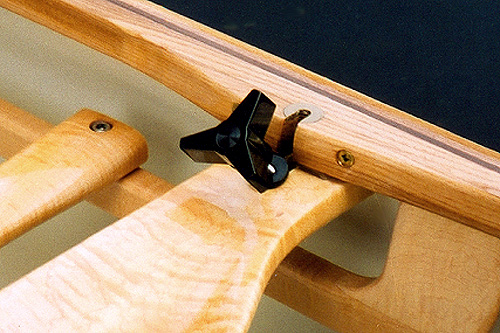
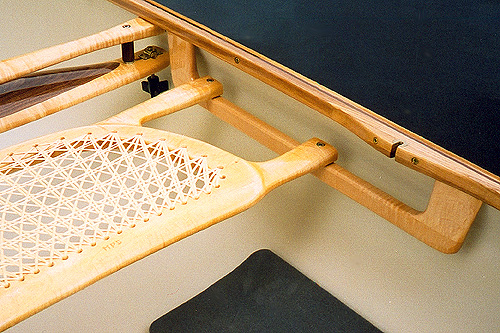
The first photo shows the overall layout with the yoke in place on my latest Osprey. The next photo shows a close up of one end of the yoke, showing the clamping knob loosened and swung into the open position. The key here is that all the parts are captive, and so nothing can fall overboard and get lost. Also, you can see that the gunwale has a built-in slot which into which the clamp fits. This ensures the correct position without the possibility of the yoke slipping even if it's not reefed as tight as can be. On the gunwale you can see that there is a 1/8 inch thick bronze washer inserted at the top of the slot, which is there to prevent the clamp from indenting the wood of the gunwales. This is aided by the black nylon washer under the clamping knob. The extra wood on the gunwale was glued on before the gunwales went into the boat, using epoxy plus the two screws. When it was glued on, the gunwale was bent into a curve at that point duplicating the curvature of the finished hull, but the slot was not yet cut at this point. I made an effort to match the grain on the added on portion, but where the match fell short of perfection, I fudged the matchup by using coloured artist's pencils in assorted shades of brown. (Don't tell ANYONE about this trick - it's one of my most closely held secrets!)
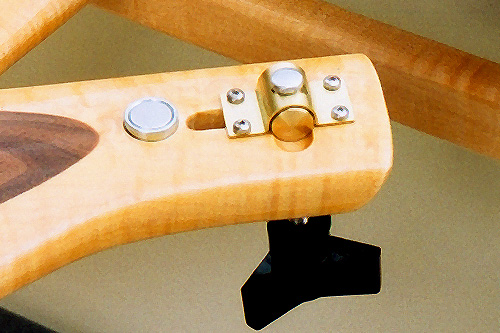
The third photo shows the yoke removed and flipped over. Here's where it gets interesting. You can see the slot in the yoke, and all the captive hardware. The brass bracket was made from scratch using 0.032" thick brass flat stock from a hobby shop. The barrel nut was made from scratch from 1/2" brass rod. The screw was made from a 1/4-20 UNC x 3" lg stainless steel carriage bolt which was heavily modified. The head was filed down much smaller using a drill press and a flat mill file. Likewise, the square under the head was filed down, and then this portion was threaded all the way to the reshaped head. To get really close, you have to reverse the threading die for the last couple of turns. After the entire assembly is complete, you determine the final length of the screw so that the knob can only be loosened about two turns from fully clamped, and then you Loctite the knob to the end of the screw permanently. The new head on the screw is what prevents the whole thing from coming apart in use. Be sure to include the black nylon washer to spare the gunwales. The knob and washer came from Lee Valley Tools. The bronze washer in the gunwales was scratch built.
Next to the clamp assembly you'll also note a little round object. That is a high strength magnet, also from Lee Valley. There are corresponding magnets on the ends of the small walnut stand-offs on the stern thwart which you can see in the first and fifth photos. The purpose of these is so that when the yoke is not in use, you can turn it upside down and store it under the stern thwart. This also works very well, although I would recommend that you don't leave it there when the canoe is being transported on top of your car.
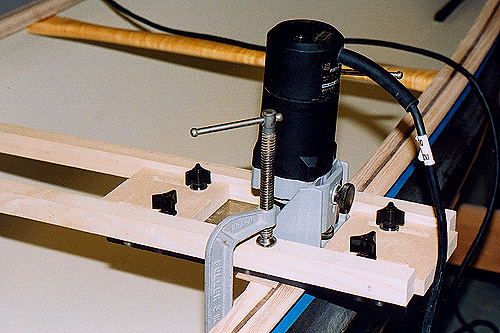
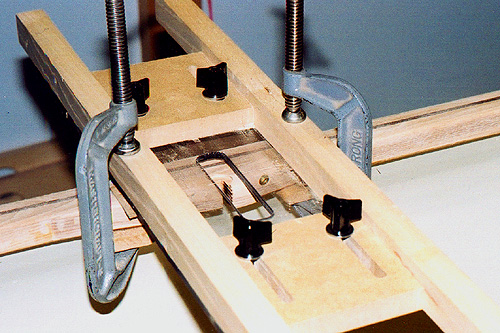
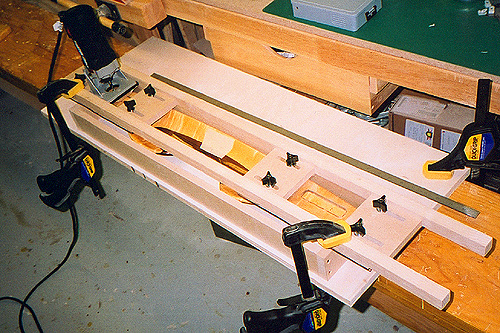
To make the slots in the gunwales, after the gunwales are fully installed of course, I made a fully adjustable router jig to work with a small laminate trimmer as shown in the first photo above. The base at each end is made of 1/4" thick polycarbonate or acrylic plastic, which has a clearance slot for the trimmer. After coarse adjusting the movable end of the jig, the smaller stop blocks are adjusted to control the actual length of travel of the router. The router base plate is propped up at one end slightly with a scrap of wood so that the router will be exactly perpendicular to the gunwales. When making the slot, lower the 1/4" router bit only about 1/8" at a time - don't try to do it all at once. Make sure that the jig cannot move during the entire process. Check the set up very carefully before actually cutting the gunwales. Also, if you are going to use a bronze or brass washer inset into the gunwales, you must counterbore the recess for it BEFORE you cut the slot, but DO NOT install the washer yet as the router cannot handle the metal. The slot will have to be cut into the brass manually. The second photo shows the slot in the gunwale with the jig still in place.
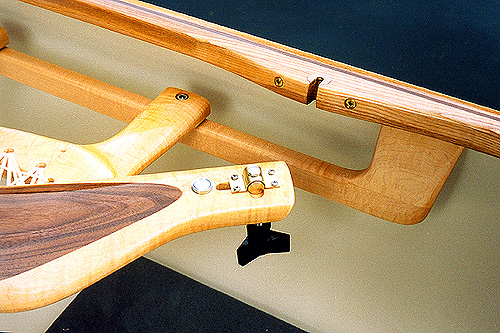
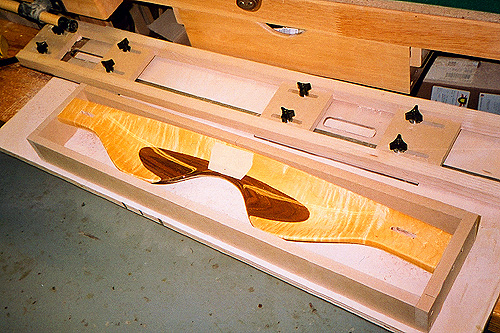
Now, when you remove the jig from the canoe, be very careful to not disturb the adjustments at all, as you will have to cut the exact same slots into the portage yoke. If your setup included propping the router up at one side, you will have to readjust the jig slightly, however, because the slots will then be shifted slightly inboard on the yoke. Before attempting to slot the yoke, it has to be fitted to the hull at the correct point. Mark the exact center of the outboard ends of the slot to be cut into the yoke, using the slots in the gunwales as a reference. Then, to support the yoke properly for the slotting operation, build a simple box frame around it, made from 3/4" x 2" mdf particle board, which you can buy precut from the Home Depot and other retaillers. Drive a couple of screws through the ends of the frame into the ends of the yoke to hold it, as shown in the third photo above. The yoke must be flush with the top surface of the frame, so install it while the yoke is upside down on the bench. Turn the completed assembly right side up and carefully line up the jig on top of the yoke and clamp it down securely. Make the slots, again being careful to lower the router bit just a little at a time, as shown in the last photo above.
Remove the yoke from the frame, and fit it into the canoe once again, this time using the clamping hardware. Make sure the adjustment barrel is at right angles to the slot, and tighten gently. Note that at this point, you won't be using the bracket yet. Very carefully tighten the knob enough that the adjustment barrel makes a slight indentation in the underside of the yoke. Now, remove the yoke again and reinstall it in the frame. Set up the router jig at right angles to the slot in line with the indentation, and set up the router to make a shallow groove across the slot to receive the adjustment barrel. This groove should be 1/2" diameter, but only 1/8" deep into the wood. If you look closely at the fourth photo in the top row, you can just make out the end of this groove. Use a 1/2" diameter Core Box Bit or Round End Bit on the router. Work carefully - you'd hate to ruin it all now. After both ends are done, complete the finishing on the yoke including varnish if you choose, and then assemble the hardware using the brackets. Note that the little brass brackets have an off-center slot for the screw, so that the screw assembly can pivot just far enough inboard to slide out of the gunwale slot, but it won't allow the screw assembly to swing far enough the other way to touch the inside of the hull when the yoke is stored under the stern thwart. The last touch is to put small, clear plastic bumper pads on top of the yoke at the point of contact between the yoke and the gunwale, to protect all your finishes. If you're going to do this, allow for the extra length before you cut the stainless steel screw to length.
As I said earlier, this is not for the casual builder, so beware. If you do try it, make sure you really understand what's involved before you start. Let me know how you make out.