The first time I tried staining the hull of a canoe I was building, I was trying to duplicate the colour of cedar heartwood. I experimented, staining pieces of scrap strip until I had the colour just right. Then, I wiped the stain onto the hull, and by the time it was done, it was practically jet-black! It was horrible. It took a good couple of days to sand it all off, and figure out what went wrong, and how to get the colour I really wanted. Having learned the hard way, I can now pass on the knowledge to you.
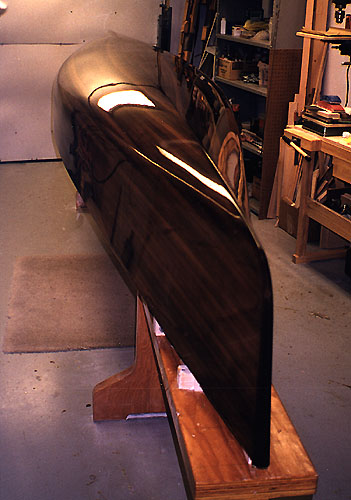
You can use stain to darken a hull overall, to add either a subtle bit of improvement, or a dramatic change in colour. The 'Agawa Bay' on the Green Valley Boat Works home page and the 'Nahanni' are examples of a 'medium-to-well-done' stain job. The photo at left shows the 'Agawa Bay' after staining, 'glassing and varnishing, and this will give you a better idea of what's possible. Click on the photo to see it large. Additionally, you can use stain selectively to even up the colour differences in the strips, although this cannot be done without darkening ALL of the hull, and it gets trickier. Bear in mind that the hull needs to be very well sanded before you stain, because there can be absolutely NO sanding after (unless it's to sand it ALL off, as I had to do!). Some folks have asked if they can stain the strips before building the hull. This does not work, because the stain does not penetrate, and would be removed as the hull is sanded.
Likewise, some folks wanted to stain one strip beforehand to get a contrast line, but no, for the same reason. To do this, you must have a darker strip of wood. Darker cedar, cedar heartwood, redwood, walnut, cherry, etc. You may have to piece it together with scarf joints. To do a narrow strip, consider carefully splitting a machined cedar strip lengthwise, and gluing in a 1/4" wide strip of darker wood BEFORE you plank the hull. Or, laminate a whole board and cut strips from it as the pros do.
But getting back to staining,, Jon Etheridge has said it very well. In his words - "The term "stain" is often applied to a material that consists of pigments suspended in an oil-based medium. This includes many brands of stain found in "do-it-yourself" hardware supply stores. Unfortunately, epoxy does not bond well to surfaces treated with oils.
One way to circumvent this problem is to use dyes to colour the wood. For wood, aniline dyes are very suitable. Aniline dyes are available through better quality woodworking supply houses. These dyes are manufactured to be soluble in one of several different solvents (water, alcohol, lacquer thinner, or oil I believe). One drawback to anilines is that they are not particularly light fast (they fade in the sun). This characteristic is also exhibited by stains. The water soluble anilines are considered the most light fast, they are easy to work with, and once the water evaporates there will be little if any interaction with the epoxy.
The water medium will raise the grain of the piece being coloured though. The grain raising can be limited by moistening the surface with a damp rag, allowing the surface to dry, and re-sanding with the final grit used on the substrate. This process may need to be repeated until the grain is no longer raised by the water. If the surface is still a little fuzzy after dyeing, lightly go over the surface with a ScotchBrite pad (the green nylon 3M ScotchBrite Scrub pad from the supermarket dish soap aisle will be fine) being careful not to "burn through" the dye. Burn throughs can be repaired by spot dyeing with the original aniline dye. One distinct advantage of dyeing as opposed to staining is that the grain of the underlying wood will not be hidden by pigment."
The most valuable lesson I learned was how to prevent the hull getting too dark. I wipe it on with a damp rag, but in order to get the colour fairly even, I found that it is necessary to apply three or four coats of fairly dilute dye to build the colour coat. Use broad overlapping strokes to blend in at the wet edge, and doing all the coats in one session to blend successive coats. If you try to do it in one pass you'll have great difficulty getting it even without it getting WAY too dark. Every spot where the strokes overlap gets much darker than in between, but with diluted dye, there will be enough passes that every part of the hull will get multiple passes, which evens thing up. This is the time when you can put an extra wipe or two on the lighter areas to help even up the shade. Once the hull is completely dry, if a small area is slightly too dark, you can rub it lightly with 000 steel wool, but feather it carefully, or it won't blend with the surrounding areas. But be VERY careful - if you rub too much it will burn through, and you can't add more stain in just one spot without leaving water marks!
The easiest way to dilute the dye and still end up with the desired colour depth is to mix up a small batch, say about 250 ml or 8 oz until you get the desired colour on a test scrap of strips with a single wipe of the staining rag. Then, add 3 times more water to get to a total of 1 litre or 32 oz. This mixture will let you do 4 passes of staining to get to about the same colour as you got with one pass of the undiluted mixture.
I use dye from Lee Valley Tools Lee Valley Tools at 1-800-267-8767. Get their 250 page colour catalogue - you'll be amazed at the great stuff they've got. They also mail four catalogue supplements per year which include woodworking techniques, tips, etc. The items I use are Brown Walnut 56Z01.03, and Red Cherry 56Z05.01, which I mix 2 to 1. However, you may want to select different colours from their catalogue. These dyes are in 1 oz. packets, and that's enough to do a least three or four canoes. I would recommend sticking with natural wood colours, and avoid the blues and greens and reds. If you want colours like that to hide really uninteresting wood, paint the hull after it has been 'glassed and sanded.
Also, do not stain the inside of the hull. Because the dye is applied with water, I'd be concerned about trapping moisture in the hull, so I would recommend AGAINST dying the inside of the hull. Also, it will be very hard to get it even in the corners. In any case, the contrast between the stained exterior and the natural interior is nice, as well as it shows that you actually did extra work to dye the outside, as opposed to the observers thinking you bought some lovely coloured wood.
A few more points:
1. Test your dye thoroughly on sanded scrap strips first, and wait for test strips to dry before you judge the effect.
2. If you feel the need to make adjustments to compensate for variations in the wood or in application, do them during the SAME session. DO NOT try to add any more dye after the coat has dried unless you do the ENTIRE hull.
3. Be aware that as you apply the dye, it will look darker because the wood is wet. It dries a bit lighter. But, it will get darker again when you fibreglass the hull.
4. If you are very careful, you can GENTLY rub out isolated darker patches on the finished dried hull with a soft grade of ScotchBrite or fine steel wool. But go VERY gently or you will cut through the stain!
5. Wear TWO pairs of rubber surgical gloves during application.
Let me know how yours turns out!