If you are a bit of a perfectionist like me, and you want to get a smooth, glossy nearly perfect varnish finish on your hull, you will soon discover that it can be maddeningly difficult. 'How to' articles are full of info on really esoteric Chinese badger hair brushes which cost $40 or more as being the key to success. Well, I don't know about that. The local hardware store has never seen a brush like that and I haven't either. But, I can get a fairly decent varnished finish on my canoes with nothing fancier than a disposable foam brush just by sticking to a fairly simple routine.
Before even beginning the boat, you may want to consider just how good a job you intend to do, and whether your workspace is adequate for your needs. Ideally, your shop should be enclosed, weather and bug proof, heated in cold climates or air conditioned in hot humid climes. It needs to be brightly lit, ideally with white walls and ceiling, for there's nothing more maddening than finishing a great coat of varnish only to find you missed spots once you get it out in the light.
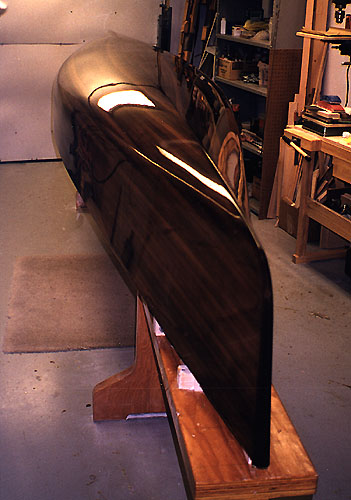
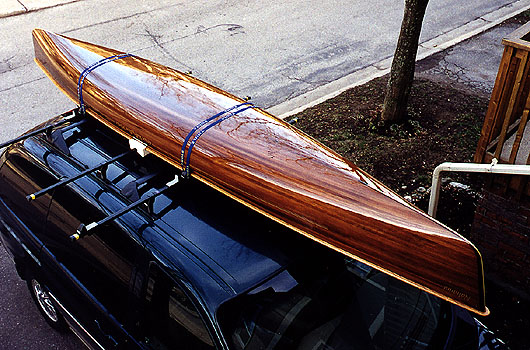
These two photos show what a good coat of varnish can look like. As you can see, I like to completely finish the outside of the hull before it comes off the mold, except for the final coat of varnish. I find it's easier to work on when it's on the mold and it's not going to move around when you're sanding between coats. If you glue the gunwales on later, carefully mask the hull and sand the varnish away on the sheer strip where the gunwale will sit. However, varnishing at this stage will increase the time for the total project, so, you must decide what's best for you.
No matter how much or little work you've done to prepare the hull, the epoxy MUST be fully cured before you apply varnish. If any of the epoxy is anything less than fully cured, the varnish in that spot will not dry and harden. If there is a cool spot near one end of your garage near the door, for example, the epoxy on that end of the canoe may not be fully cured even after a month or more. Tape plastic over any drafty areas, and keep the shop warm for a good hard cure. Also, get a hair dryer or hot air gun, and warm up the entire hull, staring at one end, and working your way slowly down the hull. This should be done a day or two after epoxying, and before sanding. Doing these will also help prevent print through, in which the weave of the cloth or the joints between strips starts to show through after a season of use. A fully cured hull should make a hard brittle sound when you tap lightly with your fingernail, just like the hull on a kevlar canoe. If it sounds the least bit dull or heavy, it's not yet cured.
To get a good varnished finish you must have good hull preparation. If this is going to be the first varnish over top of an epoxied and fiberglassed hull, the hull must first of all have been sanded smooth and fair. The better this step, the better the final result. Keep in mind that once there is a glossy coat of varnish on the hull, you will see every tiny ripple and imperfection, but these are difficult to see when the hull is dull from sanding. You can try wetting the hull with a wet cloth and looking at it from a very low angle with a strong backlight to try to see any problem areas. High spots need to be sanded down. Low spots can be built up with another coat or two of epoxy on just that area. Of course, adding more epoxy also means more time for curing and more very tricky sanding to carefully blend in. In pursuit of perfection, I have even brushed on one thin coat of varnish just to be able to see exactly where there are any remaining problems in the epoxy! Also, remember that you should use no finer than 120 grit paper for your final sanding before varnishing - the varnish cannot bond to a smooth surface. All this can be very time consuming and painstaking - only you can decide if it's going to be worth it to you.
A few days before the varnishing, clean the shop. If it's not practical to clean the whole shop, then at least clean the walls, floor, and ceiling around and near the boat, as well as any work bench or work area you need during the varnishing. If you will require heating to be on during or after the varnishing, clean any fans, grills, filters, motor, etc. so that the heater won't send dust into the air. Wipe all the dust and fingerprints, etc. off the hull with lacquer thinner to have it ready. (Make sure you have adequate ventilation.) Lay out any items you may need for the varnishing beforehand, so that you won't raise any dust rummaging for them later. Make sure that any rags you use are clean, dust and lint free. If there is the slightest chance that bugs or mosquitoes might land on the wet varnish, spray some Raid or Black Flag onto a rag outside or in another room, and put the rag in a corner of the shop. Don't spray in the shop, because fine droplets of insecticide getting on the hull can cause no end of problems with the varnish. After everything is clean and ready, close the door and stay out of the shop for at least a day to let all the dust in the air settle.
On the day you're going to varnish, first make sure that the varnish is about 5 to 10 degrees warmer than room temperature so that it flows well. If it's cooler, put it in a warm sinkfull of water (not hot) for about half an hour. Once you open the can, it will probably need to be thinned down with about 10% thinner so that it flows on smoothly without dragging. You should be dressed in clean, lint free clothes that will not produce dust or lint as you move about the shop. About the worst thing is a flannel shirt. When you are in the shop, move slowly to minimize stirring up dust, and when you're done, get out and stay out until the varnish dries.
The shop and the hull should be warm before beginning. If the hull is too cool, the varnish won't flow well. Now, for the application itself, I'm going to describe the two most critical elements, and that is how to apply the varnish evenly without dripping, running, brush marks, etc., and how to blend in all the varnish from one end of the boat to the other. Immediately before beginning, wipe down the hull with a tack cloth to remove any dust that has settled.
Using a clean 2 inch foam brush, get a good dollop of varnish on the brush by dipping it in at least a third of the depth of the foam. Do not squeeze out the brush on the edge of the can other than to get the worst of the drips, and, beginning at the far end of the hull, brush on a very thick swipe horizontally about 1 foot in length, about two thirds of the way up from the sheerline (gunwales) and the keel or centerline, transferring as much varnish onto the hull as you can. Next, using vertical strokes up and down through the varnish to quickly spread it out over the whole are, from sheer to keel, from the end to about 1 foot along the hull.
If the amount of varnish seems to be too much for this area, go a little further. To finish off this area, tip off with gentle, overlapping strokes, horizontally from the end and out past where the varnish stops be about 6 inches, gently lifting the brush at the end of the stroke so that it feathers out to the edge. Using these strokes, start at the gunwale, and work your way up to the keel. These strokes should be smooth and very gentle to finish evening out the varnish and feathering it to a thin edge. Make one complete pass, and then leave it alone. If there are a few small brush marks left, DO NOT try to do them again, as the varnish is drying rapidly and it will start to drag. Small brush marks will self level over the next few minutes.
As you are doing this first section, if the varnish is not flowing well, but seems sticky and drags, stop and wipe it off with a clean rag and some Varsol. Then, you must thin the varnish a bit more, or warm it, until it does flow well, and then start over. Also, avoid brushing it out too thin, or it'll take a long time to get sufficient build. It takes practice to get a feel for how thick you can apply it before you start to get runs. But, since you'll want at least three coats, consider the first two as practice for the final coat.
And now, the second critical element: to get the varnish to blend and flow evenly from one end of the canoe to the other, it is absolutely critical to always work from a wet edge. Therefore, you MUST NOT apply a second brushfull and keep working down the side of the boat. Instead, after the first area, immediately go to the other side of the boat, and do the same, blending with gentle overlapping strokes at the keel. Next, come back to the first side of the boat, and do the next 1 foot length. At this point, your first thick swipe should start about three inches before the feathered edge you left from the first area. Your broad, vertical strokes which spread out the varnish need to overlap the first area, as do your final horizontal strokes. You can gently brush the overlapped edge back and forth horizontally to blend fresh varnish with the previous. Then, brushing only in the direction of the unvarnished part of the boat, do the finishing off strokes, only this time, start the strokes in about the middle of the previous section, making sure that your pressure is very light and that the brush is already moving forward as it makes contact. Remember to feather these strokes out about six inches onto the next unvarnished section again. Next, do the other side of the boat the same way, blending similarly at the keel line. Keep alternating like this until the boat is done.
Once you start varnishing, do not stop for any reason. Instruct your family that you are not to be interrupted. It is amazing how little time has to pass before you begin to encounter difficulty blending in. A smooth unbroken rhythm is absolutely critical. When the boat is done, clean off the rim of the varnish can, close the lid firmly, and turn the can upside down. It should rest with one edge up on something about 1/4 to 1/2 inch high to keep the can tipped. Turning it upside down helps seal out any air leaks which can prematurely dry up the varnish, and tipping it stops the formation of 'stalactites' from the bottom of the can.
After the first coat is fully cured, carefully sand it with 150 grit sandpaper or steel wool until it is uniformly dull. The sanding provides the toothy surface necessary for the next coat to adhere, and the dull sheen lets you see any spots you miss as you're applying the next coat. Also, you will be leveling any little bumps and blemishes. Use a fresh brush for each coat (altogether, your brushes will still only cost a fraction of the cost of one of the fancy Chinese gopher belly bristle brushes, and you don't have to waste time cleaning them!)
Otherwise, your preparations for each subsequent coat of varnish should be the same as before, except that before the final coat, you can sand with 180 or 240 grit, or just steel wool.
If at the end, you have a beautiful coat of varnish, with just one or two boo-boos, these can be repaired without doing the whole boat again. After the varnish has fully hardened, about two weeks, use very fine sandpaper, 240 grit or finer, sand just the problem area, feathering out the edge of the sanded spot. Apply a good dollop of varnish over this area, and again, let it fully harden, 2 weeks or more. Then, with a hard sanding block and 600 grit or finer wet sanding paper, carefully wet sand the repair, leveling and blending with the surrounding area. Work your way through progressively finer sandpaper, 1000, 1200, and 1500 grit. Then, using a cream polish such as Meguires No.3 and a thick, soft cloth like an old diaper, polish this area. For a really high polish, switch to Meguires No.6 or higher. These materials are available from any autobody repair supplier. However, beware! The repaired spot will look SO much better than the rest of the hull, you'll be obliged to give this fine sanding and polish treatment to the entire hull!
With a little patience, you too can have a varnished hull that will leave admirers breathless with admiration! Good luck!